
We’re trying our hands at homemade yogurt. Our kids love yogurt, but they tend to get on kicks where they want it everyday and then not at all for weeks.
So, buying the big 32 ounce whole milk organic yogurt that I like to buy just doesn’t make sense for us anymore. When they were babies, that size was great for their constant consumption of homemade smoothies.
But now, sometimes we buy yogurt for a kid craving and eat it once only to let the rest go to waste.
Or, there’s perhaps a Mommy craving for delicious Lemon Poppyseed Muffins, which take 1 cup of yogurt and leave the other 3 cups to waste away in the bucket.
As a result, I’ve gotten a little frustrated with my big buckets of delicious yogurt and needed to do something about it. That’s when I remembered a post on freezable yogurt and Stephanie O’Dea’s post on CrockPot Yogurt.
So I can make my own yogurt and freeze it into portion sizes I can manage? EXCELLENT! But wait…how do you make yogurt? Well, you really don’t…you use yogurt to create more yogurt.
Kind of like how you use sourdough starter to create more sourdough. For your first batch of yogurt you’ll need 1/2 cup of store-bought (or if someone you know makes yogurt, borrow 1/2 cup of theirs).
I used the remains of my big bucket o’ whole milk organic yogurt. After your first batch is complete, you can use 1/2 cup of that batch to create the next and never have to buy yogurt again.
Fabulous…and kind of a cool little kitchen science experiment for the kids to participate in.
I personalized it and froze my yogurt in 1/4 cup portions, much like how I freeze applesauce.
The individual yogurt “pucks” are about the right serving size for my kids and it’s easy to thaw multiples for recipes.
Once the yogurt is frozen, I pop them out of the silicone muffin pan and store the yogurt pucks in a 1 gallon silicone freezer bag.
Homemade Yogurt
Adapted from Homemade Freezable Yogurt and CrockPot Yogurt.
Ingredients for 20 (1/4 cup) servings
8 cups (1/2 gallon) whole milk
4 ounces (1/2 cup) whole milk yogurt
2 tablespoons vanilla (optional)
Method
Pour milk into a 4-quart or larger slow cooker.
Cover and cook on LOW for 2 1/2 hours.
Unplug your slow cooker, keep covered and let sit for 3 hours.
After 3 hours have passed, whisk in yogurt starter and vanilla, if desired.
Cover crock and wrap a towel around your entire slow cooker. Let sit (still off and unplugged) for 8 hours or overnight.
In the morning, you’ll have homemade yogurt.
At this point, you can eat it if you like your yogurt thin. If not, set up a strainer lined with coffee filters. Place a bowl underneath to catch the whey and strain the excess liquid out of the yogurt. Ladle the yogurt in and place the contraption in the refrigerator for several hours.
Scrape the yogurt off of the coffee filters and into a bowl. Package whey separately.
Alternately, you can use a nut milk bag for this process.
Whisk yogurt to make it a more uniform consistency.
Scoop 1/4 cup portions into a silicone muffin tin and freeze.
Once frozen, remove yogurt pucks from tin, divide among freezer bags and refreeze.
Instant Pot Method
Pour milk into your instant pot. Push yogurt button, then adjust button, until your screen reads BOIL.
The boil cycle takes about 1 hour. At this point, remove the lid and check to see if you’ve reached 180 degrees Fahrenheit. If so, let the pot sit for about 5 minutes and then remove the inner pot.
Allow the milk to cool to about 110 degrees Fahrenheit, which takes about an hour (unless you use an ice bath…then it takes about 15 minutes).
Whisk in your yogurt.
Place your pot (dry it if you used an ice bath) back in the appliance and press the yogurt button and adjust until it reads 8:00.
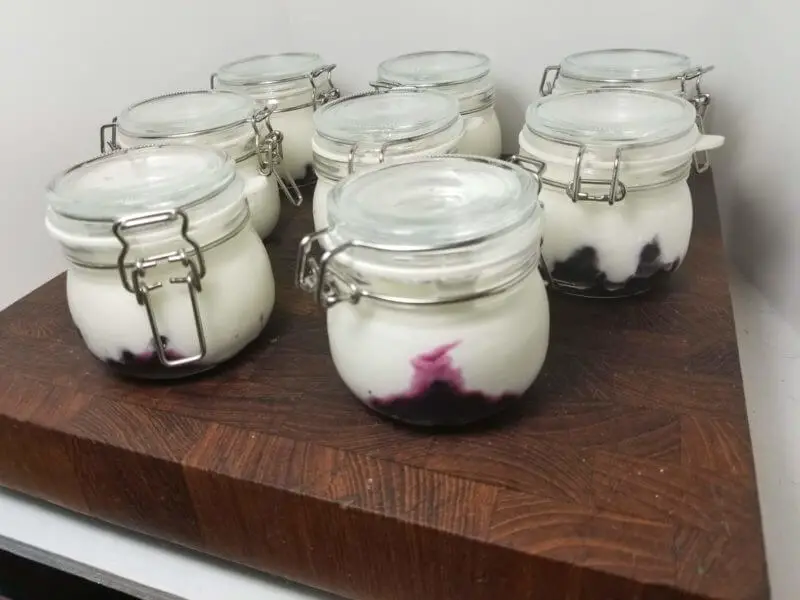
Store your homemade yogurt in canning jars.
Tip: Add fruit to the bottom of small jars and fill the rest of the way with yogurt for an easy breakfast treat or snack. The jars pictured above are from Ikea.
The Results
The kids absolutely love the flavor of this yogurt (yes, without any sugar added at all) and it is incredibly convenient to pull out those 1/4 cup portions.
The yogurt does look a little weird when you thaw it. I’ve found I have to whisk it after it thaws because it thaws separated.
But once you stir it up, it’s fine. I’ve made Lemon Poppyseed Muffins twice since I made this yogurt. Delicious.
This post is shared with Real Food Wednesday, Whole Food Wednesdays, What’s Cooking Wednesday, What’s on Your Plate?, Let’s Do Brunch, Works for me Wednesday, These Chicks Cooked and Bake with Bizzy.

Homemade Yogurt
Ingredients
- 8 cups (1/2 gallon) whole milk
- 4 ounces (1/2 cup) whole milk yogurt
- 2 tablespoons vanilla (optional)
Instructions
Pour milk into a 4-quart or larger slow cooker, cover and cook on LOW for 2 1/2 hours.
Unplug your slow cooker, keep covered and let sit for 3 hours.
After 3 hours have passed, whisk in yogurt starter and vanilla, if desired. Cover crock and wrap a towel around your entire slow cooker. Let sit (still off and unplugged) for 8 hours or overnight.
In the morning, you'll have yogurt. At this point, you can eat it if you like your yogurt thin. If not, set up a strainer lined with coffee filters. Place a bowl underneath to catch the whey and strain the excess liquid out of the yogurt. Ladle the yogurt in and place the contraption in the refrigerator for several hours.
Scrape the yogurt off of the coffee filters and into a bowl. Package whey separately.
Whisk yogurt to make it a more uniform consistency. Scoop 1/4 cup portions into a silicone muffin tin and freeze. Once frozen, remove yogurt pucks from tin, divide among freezer bags and refreeze.
Instant Pot Method
Pour milk into your instant pot. Push yogurt button, then adjust button, until your screen reads BOIL.
The boil cycle takes about 1 hour. At this point, remove the lid and check to see if you've reached 180 degrees Fahrenheit. If so, let the pot sit for about 5 minutes and then remove the inner pot.
Allow the milk to cool to about 110 degrees Fahrenheit, which takes about an hour (unless you use an ice bath...then it takes about 15 minutes).
Whisk in your yogurt.
Place your pot (dry it if you used an ice bath) back in the appliance and press the yogurt button and adjust until it reads 8:00.
Store your yogurt in canning jars.
Tip: Add fruit to the bottom of small jars and fill the rest of the way with yogurt for an easy breakfast treat or snack. The jars pictured above are from Ikea.


